Kitchen Corner

December 30, 2008

Panettone

I made this Italian bread for Christmas breakfast to cheer up the Christmas atmosphere.
Recipe:
(A) 80g raisin / 80g apricot / 150g rum
(B) 200g bread flour / 30g honey / 3g yeast / 90g water / 20g apple puree
(C) 100g bread flour /20g sugar /1/2 tsp salt / 1 tsp rum / 30g eggs / 20g milk
(D) 80g unsalted butter
(E) 30g sugar powder / 50g plain flour / 5g milk powder / 40g unsalted butter
Methods:
  1. Soak the ingredients (A) with rum for 5 hours or overnight. (If you don't fancy about liquor, replace it with orange juice)
  2. Mix ingredients (B) at low speed using a dough hook mixer till everything just combine. Place the dough in a clean bow with cling wrap to sit for 3 hours.
  3. Mix ingredients (C) with (B) and knead at low speed then turn to medium speed until it become a smooth dough.
  4. Add in the butter and knead at low speed until the butter combine with the dough. Turn to medium speed continue the kneading process until it become a smooth and elastic dough.
  5. Drain the ingredients (A) then add into (4) until the dough fill up with all the raisin and apricot.
  6. Place the dough into a lightly grease bowl and cover with cling wrap to proof for 60 minutes.
  7. While waiting for the dough, mix the ingredients (E) with finger tips until it become crumbly texture. Set aside and ready to use.
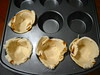
  8. Divide the dough into 3 portions and round them into balls. Place each dough into the Panettone cases and proof for 60 minutes.
  9. Egg wash the doughs and sprinkle over some crumble on the doughs. Bake at 180'C preheated oven for 25 minutes until golden brown.

December 29, 2008

Fruity Fruit Cake

Before the Christmas, I was requested by a friend to make a tray of fruit cake and wrap it as little small gifts. I really have no idea what fruit cake recipe to use as there are so many version of fruit cake recipe. Finally, I used a traditional fruit cake recipe from Nigella Lawson. I managed to buy some natural dried fruits from the market and I think natural sweet would be better than artificial sweetness. Furthermore, I reduced the sugar from the original recipe and the cake turn out just nice. The cake was really chewy with the natural sweetness and the cake crumbs wasn't too sweet and buttery. You could see from the picture the dried fruits are more than the cake crumbs which was the purpose of just to bring all the drieds fruits combine together. I baked a tray and finally I'd cut into even size of 49 pieces.

December 27, 2008

Log Cake

It's been very busy time for me in the pass few weeks. Perhaps now is the time to take a break and enjoy my baking diary. This is my first year of x'mas in this little land. I'm glad that my family could celebrate with me. We enjoyed the x'mas dinner and gifts exhanged. Although it's very tiring but absolutely worth it.
Here is my log cake for the x'mas. I used my previous roulade recipe to make this log cake simply place a few little snow man, x'mas trees and deers to make it looks a bit interesting. This log cake remind me a very old log tree I saw in the jungle during the winter years ago. It looks like a very damp, cold and old tree. I guess the Oreo crumbs make it looks so alike. But, I simply forgot to sprinkle some icing sugar so that it looks more alike :(
Well, I'm so glad they enjoyed the cakes and play around with those little snow man and deers. Very fun!

December 12, 2008

Creamy Braided Bread

These are the super soft yet tasty bread as it's produced by the cream, milk and butter. I know it's a bit unhealthy as its contain lots of fat in there. Well, I've promised to myself will not make this so often. I've given away a loaf for my friend and left one for our breakfast.
This was my first attempt on making a braided bread, it looks very ugly. Unlike the one I read from the recipe book of 孟老师的100道面包. But, I'll try to make better next time if I found a chance to give away a loaf again :P
Other than the appearance, it taste really good with the soft texture and buttery flavour.
Recipe:
(A) 200g bread flour / 30g sugar / 1/4 tsp salt / 18g egg yolks / 3g yeast / 100g cream / 40g milk / 20g butter
(B) For the crumble toppings: 30g sugar powder / 50g plain flour / 5g milk powder / 40g cold butter
How I made it:
  1. Mix ingredients (A) except butter at low speed using a dough hook mixer, then turn to medium speed until it become a smooth dough.
  2. Add in the butter and knead with low speed until the butter combine with the dough. Turn to medium speed continue the kneading process until it become a smooth and elastic dough.
  3. Place the dough into a lightly grease bowl and cover with cling wrap to proof for 80 minutes.
  4. While waiting for the dough, mix the ingredients (B) with finger tips until it become crumbly texture. Set aside and ready to use.
  5. Divide the dough into 6 portions and round them into small balls. Let them rest for 15 minutes.
  6. Roll each dough into longish shape about 28cm and form a braiding. Tighten up both side of the dough and proof for 30 minutes.
  7. Egg wash the doughs and sprinkle over some crumble on the doughs. Bake at 180'C preheated oven for 20 minutes until golden brown.

December 9, 2008

Pumpkin Chiffon Cake

Chiffon cake is my favorite dessert. It's light and taste very refreshing after storing in the fridge. I've some leftover pumpkin in the fridge and thinking to make this pumpkin chiffon last weekend. For this recipe, the pumpkin suppose to be steamed with its skin which is in green color but I peeled it days ago. So, I replace the green skin with some pumpkin seeds. Normally I'd bake all my chiffon at 160'C according to my oven thermometer. After reading my friend's blog, she recommended to turn the heat down to 140'C as the fan oven we are using is quite heat. It works! The previous chiffon I baked rise up very quickly and cracked till nobody business whereas this time it rise up slow and steady. Although it's cracked but not so serious. I like the cotton soft chiffon combine with the sweetness from the steam pumpkin with bits of crunchiness from the pumpkins seeds, yummy! Recipe for 17cm round chiffon For the egg whites mixture: 110g egg whites 55g caster sugar 5g corn flour For the egg yolks mixture: 40g egg yolks 24g milk 36g vegetable oil or olive oil 24g mashed pumpkin 10g sugar 55g plain flour 80g pumpkin cubes How I made it:
  1. For the mashed pumpkin, wash and core the pumpkin. Cut in big chunky portion and steam until tender. Peel some of the steamed pumpkin and mash. Cut others steamed pumpkin about 1cm cubes with skin. Weight the ingredients follow by the recipe above.
  2. For the chiffon cake, mix all the egg yolks mixture except flour and pumpkin cubes. When everything well combined then gradually add in sifted flour (I used electric mixer, its came very handy for this process). Mix everything well combine and no lumps left. The mixture would be very thick and and smooth. Gently mix in the pumpkin cubes.
  3. Beat the egg whites in a clean large bowl until peak foam. Gradually add in sugar, one tablespoon at a time. Then finally add in corn flour. Make sure the corn flour mix well in the egg mixture. The egg whites mixture should be peak foam, smooth and shiny.
  4. Gently fold in 1/3 of the egg whites mixture into the egg yolks mixture. When everything well combine then gently fold in the 1/2 of the remaining egg whites mixture. Lastly, fold in the remaining egg whites mixture. (Note: This stage took some times and patient and practice. Make sure all the egg whites mixture well combine with the egg yolks mixture without breaking the egg whites. Little egg whites left will cause a big hole in the cake during baking. And, over mixing will cause it hardly rise during the baking.)
  5. Pour the well mix mixture into a 17cm chiffon cake tin and bake at a 160'C preheated oven for 35-40 minutes. After baked, let the baked cake turn upside down for cooling before unmold it. . Keep the cake in the fridge it could last for 4 - 5 days. Best serve in 3 days.

December 6, 2008

Onion & Sweet Corn Rolls

These rolls taste very good probably because of the onion. A boy couldn't resists to have one when it's freshly bake from the oven (but he was only allowed to eat after an hour when the rolls cool down). I reheat a leftover roll in the 2nd day at 100'C for eight minutes, it's still very soft and yummy :) Probably is chemistry from the potato mashed
Recipe: (A) 200g bread flour 20g plain flour 15g caster sugar 1/2 tsp salt 1/2 tsp yeast 20g egg whites
100g water
20g potato mashed
(B) 15g unsalted butter
(C) 5g butter
20g finely chopped onion
100g sweet corn
1/8 tsp freshly ground black pepper
(D) Mayonnaise
1 teaspoon dried parsley
How I made it:
  1. For the fillings, finely chopped the onion and fry it in a pan at low heat until soft but not caramelize. Drain the sweet corn and add to the onion fry for another minutes. Add pepper to season. Set aside to cool and ready to use.
  2. Mix ingredients (A) at low speed using a dough hook mixer, then turn to medium speed until it become a smooth dough.
  3. Add in the unsalted butter and knead with low speed until the butter combine with the dough. Turn to medium speed continue the kneading process until it become a smooth and elastic dough.
  4. Place the dough into a lightly grease bowl and cover with cling wrap to proof for 80 minutes.
  5. Divide the dough into 5 portions and round them into small balls. Let it rest for about 10 minutes.
  6. Roll out each doughs into a longish shape and fill with the onion and sweet corn. Roll in into a sausage shape and proof for 25 minutes.
  7. Egg wash the doughs and mark few oblique line at the surface with a sharp knife at each doughs then squeeze some mayonnaise at the oblique line and sprinkle with some dried parsley. Let it continue for another 5 minutes.
  8. Bake at 180'C preheated oven for 18 minutes until golden brown.

December 4, 2008

Wholemeal Bread 全麦土司

I'd failed on making this bread before until recently I'd like to give myself another try as I'm very keen about wholemeal bread. This time, I've got the right texture and better appearance unlike the failed one which was rough crumbs and the shape was rectangular rather than square.
I think I could bake this bread quite often now for my breakfast as I probably know the mistake which is insufficient kneading. The recipe extracted from 孟老师的100到面包. After reading this recipe book, I've understand some the bread making technique and that's increase my confidence on making bread. Although it's not hundred percent similar with the commercial one but it's good enough as a homemade bread. I'm quite happy with the result as I've got the soft crumbs and right texture, it could be even store until the 3rd day and yet soft.

The recipe could be extracted from Happy Home Baking, she is one of my idol chef and very experience in making bread. Happy browsing!

December 1, 2008

Tarte au Chocolat

I like this rich chocolate tart especially its smooth and creamy texture. The chocolate filling has to be produced by a good quality of chocolate in order to get a rich and cremeuse (cremy) texture. I used 85% Lyndt chocolate for the tart and hazelnut paste that I bought from Sainsbury's. Its original recipe is actually arrange some chocolate curls on the tart but I'm quite lazy to do the chocolate curls so I toasted some chopped almond, hazelnut and walnut for the toppings.
Recipe from BBC Olive magazine:
Make 4 x 10" tartlets
For the pastry:
220g plain flour
110g unsalted butter
20g sugar powder pinch of salt
2 egg yolk + 2 tbsp cold water
For the fillings:
275g hazelnut paste (or Nutella)
125g 70% dark chocolate, plus a block for brushing the pastry
300ml double cream
450ml milk
3 eggs, lightly beaten
some chocolate shavings or toasted nuts for topping
Making the tart case:
  1. Mix the eggs yolks with 2 tbsp cold water stir with a fork until well combine.
  2. Place the flour into the bowl of a food processor, followed by the cold butter and the salt. Turn the processor on and pulse several times until the mixture resembles fine breadcrumbs.
  3. Add the egg yolk/water mixture and pulse again. Be careful not to overwork the pastry. Stop pulsing when the mixture has the consistency of chunky breadcrumbs.
  4. Turn the pastry out onto a clean, floured work surface and, with floured hands, bring together to make a dough, but don't knead.
  5. Shape into a flattened ball, wrap in cling film and refrigerate for about 30 minutes. You can keep the pastry at this stage for 2-3 days if not using it immediately.
  6. Remove the pastry from the fridge. On a clean, floured work surface, roll it out with a floured rolling pin until it's slightly larger than the flan ring. Using the rolling pin, lift the pastry and lay it over the flan ring.
  7. With your fingers, lightly press the pastry into the sides of the ring. Run a rolling pin over the top of the ring and pull away the excess pastry at the edges. Using your fingers, gently press the pastry up to slightly build up the height of the pastry at the edges. Line the tart with a piece of parchment and chill it for 20 minutes so it doesn't shrink when you cook it.
  8. Heat the oven to 200'C. Add baking beans or rice and bake it for 15 minutes, then lift out the parchment and beans and cook for a further 5 minutes or until the pastry is dry and a good brown colour. You must cook and colour the pastry properly, once the chocolate goes it it won't colour any further. Turn the oven down to 160'C.

Making the filling

  1. Put the hazelnut paste and chocolate in a bowl. Bring the cream and milk to a boil and pour it over., mix everything together with a whisk until you have a smooth liquid.
  2. Whisk in the eggs. At this point you'll find it hard to believe that the filling will set but it will end up with a beautiful creamy texture.

Putting the tart together

  1. Melt a little chocolate and use it to brush the inside of the tart, this will make the pastry leak-proof and stop it from going soggy. The secret to this bit is to brush the tart while it i still warm so the chocolate soaks in and fills any little cracks.
  2. Put the tart back on the oven shelf and pour in the filling right up to the top. Cook for 40 minutes, the tart should still be very wobbly but not liquid. Once its completely cool down, it'll set.
  3. Top with chocolate curls or toasted nuts.

November 27, 2008

Pumpkin Cheese Buns

It's always the busiest time for me at this time of year. Dinner, birthday party, holiday and X'mas really filled up my entire day. Somehow, I always enjoy the last two months in a year. This pumpkin cheese buns was made in the last 2 weeks but I didn't manage to post it.
The recipe extracted from 孟老师的100道面包. The bread was super soft and I guess that pumpkins puree helps to produce the extra soft texture.
Recipe:
(A) 200g bread flour
60g plain flour
35g caster sugar
1/4 tsp salt
1 tsp yeast
35g whole egg
35g fresh milk
35g water
(B) 65g pumpkin puree
20g unsalted butter
(C) 90g cheddar cheese
50g mozzarella cheese for toppings
How I made it:
  1. For the pumpkin puree, peeled and cored the pumpkin then cut into small cubes. Steam until just soft. Puree the pumpkin with a folk then set aside.
  2. Mix ingredients (A) at low speed using a dough hook mixer follow by the pumpkin puree. Turn to medium speed continue kneading until it become a smooth dough.
  3. Add in the unsalted butter and knead with low speed until the butter combine with the dough. Turn to medium speed continue the kneading process until it become a smooth and elastic dough.
  4. Place the dough into a lightly grease bowl and cover with cling wrap to proof for 80 minutes.
  5. Divide the dough into 6 portions and round them into small balls. Then fill the doughs with cheddar cheese and shape it into a smooth balls. Let the dough proof for 30 minutes.
  6. Egg wash the doughs and cut a cross at the top of each doughs then top with mozzarella cheese. Continue for another 10 minutes proofing.
  7. Bake at 180'C preheated oven for 20 minutes until golden brown.

November 13, 2008

Roulade

It's a great pleasure to know Jxxx recently. We've some similarities such as buying a "weird" oven which had given us lots of headache and fun too! There are some sense of humour between our conversation. The most similarities is we've a same interest, BAKING!
We just notice we're baking swiss roll in the same time without telling each other until I saw her posting. And it'd given us so much things to talk about through the comments corner. That, I feel so much interesting.
I baked two roulade days ago, they're almost the same which is rolled with chocolate sponge with oreo biscuits crumbs. It's just the decoration had a bit different which had added strawberries. The oreo chocolate roulade taste richer whereas the strawberry chocolate roulade is much refreshing.
Recipe:
5 whole large eggs 125g sugar 1g salt 100g plain flour
2g baking soda 15ml oil 50ml milk 20g cocoa powder 200ml whipping cream
20g caster sugar
1 pack of oreo biscuits (punch it into crumbs)
some strawberries
How I made it:
  1. Mix cocoa powder, milk and oil until a thick paste.
  2. Whip the eggs and gradually add in sugar. Whip until very light yellow and fluffy.
  3. Fold in shifted plain flour and baking soda. Do this gently.
  4. Fold in cocoa paste (1) until well combine. Pour into a rectangular baking pan with baking paper.
  5. Bake at 200'C preheated oven for 15 minutes.
  6. Remove the cake together with the baking paper onto a wire rack and quickly put the whole thing into a big plastic bag until it completely cool. (Make sure no air will go into the plastic bag. This is to prevent the cake drying and keep moisture so that it wouldn't crack during the rolling process.
  7. When the cake completely cool down, whip the cream until thicken. Fold in some oreo crumbs. Spread the oreo cream onto the cake evenly and roll in carefully.
  8. Spread some leftover oreo cream onto the cake roll surface and garnish with oreo crumbs.
  9. Put it in the fridge for an hour before slice. Best served in two days.

November 11, 2008

Pumpkin Cream Puffs

At this time of year you will see many pumpkins appear everywhere in the markets. I bought half and made few pumpkin cheese bread but before that let me share with you the pumpkin cream puffs made by leftover pumpkins from the bread recipe. I mixed some mashed pumpkin with custard and whipped cream together to produce the fillings. It's something different and tasty too!
Recipe: For the Puff: 70g plain flour/3 beaten eggs/100g water/60g unsalted butter/Pinch of sugar and salt For the custard: 3 egg yolks/200ml milk/60g sugar/20g plain flour/10g unsalted butter/1 tsp vanilla extract/120g pumpkin puree/150 ml whipping cream/30g chocolate
How I made it:
  1. For the puff, boil the water, butter and pinch of sugar and salt in a cooking pan until its bubbly. Off the heat, add in all the plain flour and mix with a wooden spoon until well combine and become a smooth dough.
  2. Add half of the beaten eggs and mix (this stage is a bit hard work but please patient and keep stirring until the egg mix into the dough.)
  3. Once the eggs completely mix with the dough, you will find it quite dry and hardly to mix. Add the beaten eggs little by little into the dough and continue mixing. You might not finish using the beaten eggs. You will need to have a smooth and silky consistency of the mixture. When you spoon up the mixture, it should drop back to the pan very slowly. The mixture should not too dry or too wet.
  4. Once you get the right consistency of mixture, transfer it into a piping bag and pipe out about 20 dollops of mixture on a baking tray with baking paper.
  5. Dip your fingers with some water and gently touch the top of the mixture. This is to prevent it over burning while it's baking in the oven. Then spray some water on the mixture surface. (Not too much)
  6. Bake at 200'C preheated oven for 15 minutes until it puff up then turn the temperature to 170'C and bake for another 15 minutes.
  7. Transfer the puff on a wire rack to cool down.
  8. For the custard, boil the milk with sugar until sugar dissolve but not boiling. Meanwhile, mix the egg yolks and flour a thick paste but no lumps. Add two tablespoon of milk if you find it too dry to mix.
  9. Pour the dissolve warm sugar milk into the egg yolks mixture, pour little by little and mix with a hand whisk until everything combine. Then, pour back the mixture into the cooking pan. Cook in very low heat and keep stirring until it thicken.
  10. Once the mixture thicken, remove from the heat and keep stirring until the heat slightly cool down but slightly warm. Then add in the butter and vanilla extract. Continue stirring until well combine.
  11. Transfer the custard into a plate and cover with cling film. Make sure the cling film touch on the mixture, this is to prevent it from skin forming on its surface.
  12. When the custard completely cool down, mix in the mashed pumpkins until well combine. Whip the cream until thicken and fold into the pumpkin custard.
  13. Transfer the pumpkin custard into a pipping bag and squeeze into the puffs.
  14. Dip the pumpkin cream puff with some melted chocolate and chill in the fridge until cool to serve.

This is something very fun which I think it helps relating people who has the same interest with. The rules for tagging is link to my blog (tagger) on your blog. Give seven facts about yourself then tag another seven bloggers by leaving a comment on their blogs and letting them know they were tagged and listing them (and their blogs) on your blog. Here is how I followed:

  • I bake madly in the kitchen. My hand feel itchy if I didn't touch my kitchen stuffs for some time.
  • I spend lots of time in research of baking from the internet, books or friends. I've not attended any baking classes or courses yet. But looking forward to attend one day.
  • I like to walk, I can walk many miles. But the land I'm living right now just too small and too hot for me to walk.
  • I hate packing but I've got to do it as I'm moving country to country with my other half.
  • I hardly understand myself until I've married because I wasted lots of time investing on my study then finally I realize what I really interested which was not relating to my study.
  • I afraid of leaving. Leaving someone is just like a world war.
  • Jesus is my best friend, only Him can give me the peace of mind.

7 bloggers that I'm passing on:

November 6, 2008

Strawberry Ice Cream

"...once you start, this ice-cream making thing become addictive" from Nigella Lawson.
I think it's absolutely true as I'm getting addictive in making ice cream. Once you master the method of making custard, making ice cream is just easy-peasy. Again, this recipe extracted from the book "Forever Summer". This is a very refreshing ice cream with very rich strawberry flavor. It's so good to have a big scoop especially living in this hot and humid land.
Recipe extracted from "Forever Summer"
  1. Hull and rougly chop the strawberries, put them into a bowl and sprinkle over 2 tablespoons of caster sugar and leave them to steep and infuse with flavour.
  2. Pour the milk and cream into a heavy-based saucepan, and add the vanilla pod, split down the middle lengthways. Bring the pan nearly to the boil and then take it off the heat and leave to infuse for 20 minutes. (I used vanilla extract. So, I added it into the custard at the end.)
  3. In a large bowl whisk the egg yolks and the sugar until thick and pale yellow. Take the vanilla pod out of the milk and cream and pour, whisking the while, the warm liquid over the yolks. Put the cleaned-out pan back on the heat with the cream, milk, egg and sugar mixture an stir the custard until it thickens, then take it off the heat and pour it into a bowl to cool.
  4. Puree the strawberries in a processor, and when the custard is cool fold in the lemon juice and strawberry puree.
  5. Freeze the ice cream in an ice-cream maker then put it into an ice cream container at least 20 minute before serving. (I used kitchen Aid Ice cream bowl for 20 minutes of whisking)

November 4, 2008

Parsley Buns

I think I was just not able to post my baking result on time recently. It's too much to do for the baking, cleaning, photo shooting and so on. Well, this parsley buns was made on last week for my friends. I've tasted one and it's absolutely delicious! Recipe from 孟老师的100道面包 (A) 150g bread flour/50g plain flour/15g caster sugar/1/4 tsp salt/1/2 tsp yeast/130g fresh milk (B) 15g unsalted butter (C) 30g unsalted butter(soften at room temperature)/10g sugar powder/1/2 tsp salt/1 tsp fresh milk/1tsp dried parsley How I made it:
  1. Mix ingredients (A) at low speed using a dough hook mixer, then turn to medium speed until it become a smooth dough.
  2. Add in the unsalted butter and knead with low speed until the butter combine with the dough. Turn to medium speed for the kneading process until it become a smooth and elastic dough.
  3. Place the dough into a lightly grease bowl and cover with cling wrap to proof for 80 minutes.
  4. While waiting for the dough, mix the ingredients (C) until it become a smooth paste. Put the parsley paste into a piping bag.
  5. Divide the dough into 6 portions and round them into small balls. Let them rest for 10 minutes.
  6. Roll each dough into a sausage shape and proof for 30 minutes.
  7. Cut a line on the middle of each dough and continue proofing for another 10 minutes.
  8. Egg wash the doughs and squeeze some parsley paste at the center. Bake at 180'C preheated oven for 18 minutes until golden brown.

November 1, 2008

French Apple Tart

I've got a simple and delicious apple tart recipe which no require any butter mixed or frangipane. What I need is just a big packet of green apple with a shortcrust pastry which already had in my fridge, and took me no time to make this tart. I didn't produce a very beautiful rosy look for the tart but I'd say the apple tart smell very good while it's about the time I need to check whether it's done.
I feel the beauty of this tart is that you could still have a big piece of it after your dinner as it's quite a light dessert and not too sweet. You will like to have the second piece.
About the shortcrust pastry, I've been using the recipe for different kind of tarts and it's work very well. Its crusty and crumbly texture is very the English homemade pastry.
If you find the French apple tart is a bit lonely, just serve with a dollop of cream or vanilla ice cream to go with it. Fantastic!
For the shortcrust pastry (9 inches tart tin):
2 egg yolks
2 tbsp cold water
220g plain flour
110g unsalted cold butter, diced
20g sugar powder
pinch of salt
  1. Mix the eggs yolks with 2 tbsp cold water stir with a fork until well combine.
  2. Place the flour into the bowl of a food processor, followed by the cold butter and the salt. Turn the processor on and pulse several times until the mixture resembles fine breadcrumbs.
  3. Add the egg yolk/water mixture and pulse again. Be careful not to overwork the pastry. Stop pulsing when the mixture has the consistency of chunky breadcrumbs.
  4. Turn the pastry out onto a clean, floured work surface and, with floured hands, bring together to make a dough, but don't knead.
  5. Shape into a flattened ball, wrap in cling film and refrigerate for about 30 minutes. You can keep the pastry at this stage for 2-3 days if not using it immediately.
  6. Remove the pastry from the fridge. On a clean, floured work surface, roll it out with a floured rolling pin until it's slightly larger than the flan ring. Using the rolling pin, lift the pastry and lay it over the flan ring.
  7. With your fingers, lightly press the pastry into the sides of the ring. Run a rolling pin over the top of the ring and pull away the excess pastry at the edges. Using your fingers, gently press the pastry up to slightly build up the height of the pastry at the edges.

Assemble the apple tart:

  1. Peel and core the apple then cut in to half and slice it into the thickness you like. I slice it quite thinly.
  2. Arrange the apples decoratively on the pastry shell, overlapping them. Sprinkle the sugar on top of the apples, top with butter cubes and bake in the middle of the 180'C preheated oven for 45 minutes or until the crust is cooked through and the apples are golden.
  3. Brush with the heated apricot jam while the tart is still hot.

October 30, 2008

Cashew Nut Mix

I bought a packet of raw cashew nut from a cashew nut factory in Phuket and this recipe for people who always craving madly like me :P Enjoy!!
  • Preheat the oven to 170 degrees C. Line a baking sheet with parchment paper. In a bowl, toss 1 cup raw cashews, 1 tablespoon maple syrup, 2 pinch of cinnamon and curry powder and pinch of sea salt until well mixed.
  • Spread the mixture onto the baking sheet. Bake until golden brown, stirring half way through, about 10 minutes. Remove from the oven and scrape the nuts onto a plate to cool.
  • When the nuts are cool, put them into a bowl and toss together with 1/3 cup of halved dried apricots and raisins.
  • Store in an airtight container or follow the serving suggestion. I bet you will finish it within two days :P

Serving suggestions: Divide the mix into small individual containers for snacking. Spoon a few tablespoons over a serving of yogurt or frozen yogurt. Add a few tablespoons to a bowl of fruit salad

October 28, 2008

Dried Fruit Milky Bread (鲜奶干果面包)

I miss my kitchen very much after a holiday break and I can't resist to do some baking. So I simply make something with whatever ingredients that left in the kitchen cabinet. This recipe suppose a "Sweet corn milky bread 鲜奶玉米面包" but I don't have sweet corn.
So I replaced it with some dried apricot and raisin and it's ok! The bread was quite soft and tender that came with the chewy dried fruits.
Recipe from 孟老师的100道面包
(A)
Bread flour 200g
Sugar 35g
Salt 1/4 teaspoon
Egg 35g
Yeast 3g
Fresh milk 100g
(B)
Unsalted butter 15g
Sweet Corn 80g or (40g dried apricot and 40g raisin)
How I made it:
  1. Mix all the (A) ingredients until smooth and well combine in medium speed with the dough hook mixing machine.
  2. Add in unsalted butter and mix in low speed. When everything well combine increase to medium speed until the dough become smooth and elastic. It tooks about 10 minutes.
  3. Add in sweet corn or dried fruits and mix in low speed.
  4. Transfer to a grease bowl and cover with a cling warp proof for 80 minutes.
  5. Divide the dough into five portions and shape it into smooth balls. I place it into a 17cm chiffon cake tin for second proofing at about 40 minutes.
  6. Egg wash the dough and bake at a 180'C preheated oven about 25 minutes.
  7. Transfer the dough into a cooling rack. I place the bread into a plastic bag when it's still slightly warm (not too hot). I think it could keep the bread a bit moisture at the outside and produce a soft and tender bread. Then transfer to an airtight container once it's completely cool down.

October 17, 2008

BACI Ice Cream

I bought an ice cream bowl attachment for my KitchenAid mixer recently as I've been eager to make myself a box of homemade ice cream for long long time. This ice cream bowl has to be stored in the freezer for 15 hours before the process of making ice cream, sorbet or gelato. I stored the ice cream bowl at the back of my freezer at all times that gives me the flexibility to make any frozen desserts on a whim.

I had a recipe book "Forever Summer from Nigella Lawson" with me for quite some times but just have no chance to follow her recipe as I don't have an ice cream maker. This book had many cold dessert recipes including ice cream. I've choosen a recipe called "BACI ICE CREAM". This is quite like a French or Italian ice cream as the ingredients used including custard. It had a very rich texture which is quite like the Häagen-Dazs. After had my first attempt on making ice cream, I think I've fallen in love with it.

I've got the Baci Ice Cream recipe on the website which is exactly the same in the book of "Forever Summer". Check it out if you like to give it a try.

October 14, 2008

Lasagne

This is always the best dish for serving my guests as it's so delicious especially the mince sauce could be ready in advance so that I can have a relaxing gathering with my guests while the lasagne is baking in the oven. I followed Jamie Oliver's recipe from the book of "Jamie's Dinner" (except adding the butternut squash but replaced with some fresh mushroom). I get ready the minced sauce and white sauce in the fridge before the day my guests arrive. Then, reheat it when about to assemble the lasagne (it only took me few minutes). I found the sauce is much tasty after a day for sitting in the fridge. I packed a small piece of left over lasagne with cling wrap and aluminium foil then placed it into the freezer after it completely cool down. Reheat it in the oven for my next lunch, it's incredible tasty! I found that the recipe is available at the Jamie's website. So I don't type it here. Please forgive my laziness :P

October 9, 2008

Grissini

I've got another craving food here, Grisini. It's also named as "breadsticks". Other than granola, biscotti, nutty french balls, I've got this adding into my craving container recently. It could be made by different kind of flavours such as nuts, cheese, seeds, chocolate etc. I used sesame and parmesan cheese for my first attempt on this grissini. The recipe extracted from "孟老师的100道面包". Mixture (A) Bread flour 150g Plain flour 50g Sugar 15g salt 1/2 teaspoon water 100g instant yeast 1/4 teaspoon (1g) Parmesan cheese powder 20g Mixture (B) Unsalted butter 15g Egg whites 20g White seasame 1 tablespoon Black sesame 1 tablespoon
  1. Mix all the mixture (A) in a mixing bowl with a dough hook at low spead then medium speed until everything well combine and become a smooth dough.
  2. Add in unsalted butter continue kneading with a low spead until the butter mix with the dough then change to medium speed until it become a very smooth and elastic dough.
  3. Proof it in a large bowl cover with cling wrap for 50 minutes.
  4. Roll the dough out at 0.3 cm thick in rectangular shape. Brush egg whites on the roll out dough and sprinkle with sesame. Use the hand to gently press the sesame to stick at the dough.
  5. Using a roller cutter to cut longish shape at 1cm thick then twist it with your hand by holding each side of the end of the dough.
  6. Place on a baking tray and bake for about 15 - 20 minutes at 150'C until it golden brown color.

October 2, 2008

Chocolate Marquise

This was one of the best selling product at Bake To Order no matter in what season. It's made by dark chocolate that would definately satisfy those chocoholics. The recipe extracted from BBC-Food website conducted by my idol chef, Lesley Waters. The texture is quite like mousse, soft yet rich cocoa flavour. You would rather let it melt slowly in your mouth for few minutes and swallow it slowly before you have the next spoon. The recipe is quite simple to make as it could be made in advance. Store it in the fridge then serve it right after a meal for the guests with no hastily. I used 70% dark chocolate and reduced 1/3 sugar from the original recipe. It's best serve with a dollop of whipped cream and fresh berries.

September 29, 2008

Matcha Sorbet

I've been using a brand of matcha powder bought from "Shaw House" at Orchard. I love its fragrant as the flavor works well for cakes or desserts and the color is so refreshing. I made few cups of matcha sorbet followed the recipe from "点心达人轻松学". It's simple to made and low fat. I think sorbet is low fat than ice cream as its made by water or milk. I used MEIJI low fat milk for the sorbet and reduce some sugar from the original recipe. I like this recipe as it's really refreshing. Method:
  1. Boil the milk and cream in a pan.
  2. In another bowl, mix green tea and sugar until well combine. (I used about 40g sugar)
  3. Gradually add ingredients (2) to (1) and mix until the sugar and green tea dissolve.
  4. Filter the mixture and pour into a shallow dish.
  5. Cling wrap the dish and store in the freezer for 4 hours or overnight.
  6. Cut the freeze sorbet in cubes then blend in a food processor.
  7. Scoop out the sorbet and it's ready to serve.

September 26, 2008

Vegetable Pizza

I followed a pizza dough and tomato sauce recipe from Jamie Oliver (Jamie's Dinner). Again, his recipe is wonderful! I've never failed by using his recipe. For the topping, I simply sliced some mushroom, red and green pepper and finally topped with some cheddar and mozzarella cheese. I would say, the tomato sauce makes the pizza smell very good and delicious. Recipe for quickest tomato sauce: I made 250ml (you might not need to use all) 2 cloves of garlic, peeled and finely sliced a bunch of fresh basil leaves, picked an torn 600g tins of whole plum tomatoes sea salt and freshly ground black pepper 1 dry bay leave
  1. Fry the garlic with some olive oil in a pan then add in basil and tomatoes. Using the back of the spoon, mush and squash the tomatoes as much as you can.Season the sauce with salt and pepper and add the bay leave.
  2. Let it simmer at the medium low heat. The tomatoes will break into puree. Let it cook for 15 minutes until the mixture puree and dry. Leave to cool and ready to use.

Recipe for the dough: I made two pieces of 8 inches pizza

200g bread flour / 1/4 tbps fine sea salt / 3.5g yeast / 5g sugar / 163g water

  1. Knead all the ingredients until smooth springy soft dough, cover it with clingfilm and let it rest for 1 hour until the dough has double in size.
  2. Knocking back the dough by kneading and pushing the air out with your hands. Divide the dough up into 2 balls and rest for 15 minutes.
  3. Roll the doughs into circles about 0.5cm thick and place on a flour-dusted tinfoil then proof for 40 minutes. Place the foil together with the dough on a pre-warmed flat baking tray or pizza stone. The dough will start to bubble and cook immediately.
  4. Then quickly spoon 3 to 4 tablespoons of tomato sauce into the middle and spread it out evenly. Add all the ingredients like vege, ham etc. Then top with cheese and season with salt and pepper and drizzle with olive oil.
  5. Place the pizza in the 220'C preheated oven and cook for 10 minutes until the pizza base is golden, bubbly and crisp around the edges and the tomato and cheese topping is melted.

September 23, 2008

Apple Chiffon Cake

Here is my second attempt on apple chiffon cake. I've made a 17cm and a 22cm round chiffon. It took some time to made this cakes as the apple need to be cooked first before making the cake. I bought few apples that came with very red skin to produce a lovely pink color for the cooked apple. Most of the chiffon cake I've been making consist of corn flour. I followed a recipe book named "戚枫蛋糕秘法转授". I think it's the best chiffon recipe book I had so far. The book stated that adding some corn flour in the egg whites will absorb the liquid of the egg whites in order to stabilize the meringue and produce a special texture. I guess its chemical reaction is quite similar with cream of tartar or lemon juice. I like the recipe because it don't consist of chemical element such as baking powder or cream of tartar but just the ordinary ingredients like egg, water, oil, flour, sugar and natural color from fruits or vegetables. Recipe for 17cm round chiffon For the egg whites mixture: 110g egg whites 55g caster sugar 5g corn flour For the egg yolks mixture: 40g egg yolks 36g water 36g vegetable oil or olive oil 55g plain flour 150g cooked apple For decoration: 200ml Whipping cream 12g caster sugar some cooked apple few pieces of mint leaves How I made it:
  1. For the cooked apple, peel 3 large apple and finely chop the skin or blend it in the blender. Cut the apple in small cubes. Mix the chopped skin with apple cubes. Weigh the mixture.
  2. Mix 15% of caster sugar from the weight of mixture (1) and cook with 4 tablespoon of water until the juice absorb and the cooked apple appear soft pink color.
  3. For the chiffon cake, mix all the egg yolks mixture except flour. When everything well combined then gradually add in sifted flour (I used electric mixer, its came very handy for this process). Mix everything well combine and no lumps left. The mixture would be very thick and and smooth. Gently mix in the cooked apple (make sure the cooked apple had completely cool down).
  4. Beat the egg whites in a clean large bowl until peak foam. Gradually add in sugar, one tablespoon at a time. Then finally add in corn flour. Make sure the corn flour mix well in the egg mixture (Using an electric mixer would be great!). The egg whites mixture should be peak foam, smooth and shiny.
  5. Gently fold in 1/3 of the egg whites mixture into the egg yolks mixture. When everything well combine then gently fold in the 1/2 of the remaining egg whites mixture. Lastly, fold in the remaining egg whites mixture. (Note: This stage took some times and patient and practice. Make sure all the egg whites mixture well combine with the egg yolks mixture without breaking the egg whites. Little egg whites left will cause a big hole in the cake during baking. And, over mixing will cause it hardly rise during the baking.)
  6. Pour the well mix mixture into a 17cm chiffon cake tin and bake at a 160-170'C preheated oven for 40 minutes. After baked, let the baked cake turn upside down for cooling before unmold it. (Note: The recipe book stated that to cling wrap the entired cake tin and place in a big plastic bag once its completely cool down. Then, place in the fridge for over night to emit the fragrant of the cake and stabilize the cake for decoration).
  7. Unmold the cake and whip the fresh cream with sugar. Decorate it like the picture shown above or decorate it with your creativity.
  8. Keep the cake in the fridge it could last for 4 - 5 days. Best serve in 3 days.

September 17, 2008

Chiffon Cup Cakes 杯子蓝莓戚枫蛋糕

These is very light and tasty cup cakes with the combination of blueberry puree, whipped cream, custard and fresh strawberries. I followed a recipe book (不用模型做点心) which use a blueberry chiffon cake mixture to produce these cup cakes. As this cake is very light, you might need a slightly bigger cups to fill in the large amount of mixture to fulfill your appetite. It's great to have a cup of this after the dinner or as a refreshment in the afternoon. Recipe from (不用模型做点心) 4 egg yolks 30g sugar 2g salt 1 tsp vanilla extract 80ml milk 60ml oil 135g plain flour 4g baking powder 6 egg whites 70g sugar For the fillings: 40g blueberry puree, some fresh strawberries, 100ml whipping cream, custard and bluerry puree Method:
  1. Whip the egg whites until peak form then slowly add in sugar continue whipping until a shiny and smooth consistency.
  2. In another bowl, mix egg yolks, oil, milk, vanilla, flour and sugar until everything combine.
  3. Add in 1/3 of the egg white mixture to egg yolks mixture(2) until combine. Then add half of the left over egg whites mixture. Then continue adding the remaining egg whites mixture. Slowly and gently combine everything.
  4. Gently mix in the blueberry puree to get a marble effects. Pour the mixture into each baking cups and bake for 20 - 25 minutes at 180'C.
  5. When the cake cool down, cut a hole at the center with a serrated knife and reserve the lids. Squeeze in some custard, whipped cream and blueberry puree. Finally, top with a strawberry and some blueberry puree then place back the lids.
  6. Keep in the fridge. It's nice to served cool.

September 15, 2008

Napoleon Walnut Roll

Continue with the previous chapter - Mille Feuille, I made it into a Napoleon Roll by using a swiss roll sponge, custard, whipped cream, some chopped toasted walnut and the puff pastry. The texture was crisp from the inside and soft at the outside. The walnut had added a crunchy texture and the cream and custard had moisten up the entire roll. Ingredients for the sponge: 4 eggs / 80g sugar / 67g plain flour Method: Place the eggs and vanilla extract into a bowl. Gradually add in sugar and whisk until pale and thickened. Sift the flour into the bowl and fold together. Pour the sponge mixture into a baking tray with baking paper and bake for 10 minutes at 200'C preheated oven. Place the cooked sponge on a wire rack and place the sponge together with the wire rack into a plastic bag for cooling down. This is to keep the sponge moisture and much easier to roll up. Ingredients for the fresh custard: 2 egg yolks / 133ml milk / 40g sugar / 13g flour / 1 tsp vanilla extract / 6g butter / 2 tsp Rum (optional) Method: Mix the egg yolks with two teaspoon of milk in a bowl until well combined. Then, mix in the flour and make sure there is no lumps. Place the milk in a saucepan with vanilla extract and sugar, bring to the boil. Once the sugar dissolve in the milk, gradually pour onto the eggs mixture and stir then pour back into the pan. Return to the heat and using a whisk, lightly stir the mixture to thicken, do not boil. As the egg yolks warm, it will thicken to create custard. Keep stirring until it coats the back of the spoon. Remove from the heat and keep stirring and add in the butter. When the custard slightly warm add in rum. Pour the custard into a shallow bowl and cover with cling wrap. Place it into the fridge when it completely cool down and ready to use. To assemble the roll:
  1. Spread the whipped cream onto the swiss roll sponge evenly. Divide the puff pastry into 3 longish shape portions (second picture).
  2. Stack a piece of the pastry on the sponge. Spread some custard on the pastry and sprinkle some toasted walnut (chopped).
  3. Stack another piece of pastry and continue like the step 2 until the last piece of pastry.
  4. Roll up the sponge with cling wrap and chilled in the fridge.
  5. Cut the roll with a serrated knife into 8 thick portions.