It's a big day of my other half and it's always a headache of thinking what type of birthday cake for him is the best as you might have the same feeling like me hope to give the best to our life partner, right?! Since he likes durian a lot and I still have a box of frozen durian, why not make a durian cake or durian cheesecake for him. Thinking along the way, if you did follow my blog you'll know that I've just made a
durian cake and
durian cheesecake not long ago. So, it's not a good idea to do the same for him which is nothing special anymore.

Time is limited, I don't really have much time to think somemore as his birthday is just around the corner. Ended up, I make durian cheesecake again, but with a Non-Baked version sandwich with plain spongy cake. I followed a
sponge cake recipe from a video clip and luckily it turn out really good. If you did try my chocolate spongy cake before, you will know this lady. Again, I'm very satisfy with her recipe.

For the cheese filling, I'm very particular with chilled cheesecake, as too much gelatin will cause the cake like jelly type. I'm really looking for a soft, light and melt in-the-mouth texture but not jelly cake. So, really have to be cautious about the portion of gelatin added in.

I was quite nervous when he was taking the first bite of this durian cheesecake, guess what? It's so obviously show the satisfaction from his face. I couldn't believe it and I quickly tried the first bite too and it's really something I was looking for. It's soft, light and super tasty for us and couldn't feel the gelatin texture. As I added less gelatin in the batter, the cake couldn't stay at room temperature for too long but it set and stand nicely in the fridge. I'm really glad that the cheesecake turn out very well. When he is happy, I'm happy too!
Ingredients for the plain sponge cake:
(Please follow the
video clip)
140g plain flour
4 eggs
30g milk
180g sugar
4g salt
30g oil

Ingredients for durian cream cheese filling:
350g cream cheese
60g caster sugar
250g durian flesh
350 whipping cream
1 tablespoon gelatin
3 tablespoon water
For the filling, beat cream cheese and sugar until smooth. Stir in durian flesh until well combine. Now, get ready for others ingredients. Melt gelatin powder with water over simmering water until the gelatin dissolve. Whip the cream until thicken but not over whipped. Stir in 4 teaspoon of gelatin into cheese mixture until well combine then fold in the whipped cream. Keep the remaining gelatin for the toppings. Place a slice of sponge cake into 8 inches lose bottom baking tray. Spread in half of the durian cheese mixture. Place another layer of sponge cake on top. Spread half of the remaining cheese mixture on top and chilled in the fridge. Mix together the remaining gelatin and cheese mixture and put into a piping bag. Place in the fridge for about 30 minutes until it slightly set (the time depends on how cool the fridge is, so watch it and try to squeeze out a little to test whether it could form any pattern). Pipe out any pattern you like onto the cake and chilled in the fridge for over night. Enjoy!


 Last year, I made Panettone for X'mas but did not manage to try out any Stollen recipes. So, this year I got to try a Stollen recipe first before Panettone. It's something new to me and I think the texture is something like Panettone. Again, Stollen is also one of the bread that Italian will have during the X'mas but now everywhere having it for this lovely season.
 I'm not sure why Stollen had its unique shape, anyway I just followed the recipe. The texture is soft on the day it's baked and taste quite good with some dried apricot, cranberries, raisin and the crunchy pecan had given it extra texture. Not to forget, my favorite ingredients "cinnamon" make this bread taste better. My hubby and I very much prefer Stollen and Panettone instead of Fruit Cake.
 The bread wasn't that soft the next day. So, I tuck it back to the oven at 200C losely wrapped with aluminium foil to warm it back, then it's turn soft again and it's nice to serve warm I feel. My first experiment told me that I should make it again to give away as a gift very soon.
 I made some savory scones this morning and it took me no time to get a fresh yet delicious scones out from the oven. It's truly yummy with some cheese and back bacon added. I must say the crumbly and fluffy texture is a winner. One thing for sure it's got to be eaten warm. Anyway, it's really a simple and no much time consuming recipe that you can make it at anytime either in the morning or make it for afternoon tea. For me, it's my all time favorite snack! This great recipe came from "
 The first thing I do is making the buttermilk by adding
  Make a well in the center of the flour mixture, pour in 2/3 of the buttermilk and use chopstick to mix everything until it turn into a mess. You don't want a smooth round dough but a sticky and messy mixture. If dough is too dry, add in more buttermilk. For me, 2/3 is more than enough for the mixture.Turn the mixture out onto a lightly floured working surface, add the fried bacon and cheddar cheese. Using both hand to bring everything together and pat the mixture into 2cm thickness. Cut the dough with 5.5cm floured cutter and pressed all the way down without twisting or turning the cutter. Place on a baking tray lined with baking paper then glaze the surface with some leftover buttermilk. For more cheesy texture, sprinkle some shredded cheddar cheese on top. Bake in a preheated oven at 220C for 15 minutes. Serve warm and no jam or cream needed. Enjoy!

 It's quite easy to make and the result was good with a spongy, light and fluffy texture. My previous cocoa sponge was slightly dry whereas this one stay moist which you can eat it straight. Not only that, the main thing is the sponge can be used as a cake base for making all kind of celebration or party cake. Feel free to watch the video clip on how the lady chef did it as well as my final result of experiment. See how spongy it is :)

 After the first attempt on
  The cheesecake was not too bad but I still like the texture of durian cheesecake as it's very smooth and silky texture that melt in the mouth was great! This texture is slightly thicker that might take a few more second to melt in your mouth.
 I tried to place a piece at room temperature for 15 minutes and the texture was not that thicker then. The crumble is very tasty and goes well with the cheesecake but the apple cherry wasn't that very special. It taste ok but nothing so special for me.
 I've done a few study from the recipe book and found that some cheesecake had a very silky smooth texture. I remember before baking the durian cheesecake, the batter was quite liquid or should I say runny whereas this batter of cherry cheesecake was quite thick.
 I guess it's due to the ingredients used. Although they both used the same amount of inggredients like cream cheese, sugar and eggs. The different is batter that added with same milk or cream is smoother than the batter made with cream cheese and eggs only. The durian cheesecake was added milk whereas this is not, may be that's make the difference. Please correct me if I'm wrong but so far this is the experiment I've gone through. Anyway, people who are not very choosy like me will still love this cheesecake. It's just an ordinary one for me :P
Recipe from 我和起士蛋糕的秘密 for (7 inches cake tin)
I guess it's due to the ingredients used. Although they both used the same amount of inggredients like cream cheese, sugar and eggs. The different is batter that added with same milk or cream is smoother than the batter made with cream cheese and eggs only. The durian cheesecake was added milk whereas this is not, may be that's make the difference. Please correct me if I'm wrong but so far this is the experiment I've gone through. Anyway, people who are not very choosy like me will still love this cheesecake. It's just an ordinary one for me :P
Recipe from 我和起士蛋糕的秘密 for (7 inches cake tin)
 I've some leftover cinnamon buns and I want to give it a twist to something else. Bread butter pudding is a very traditional English dessert that usually serve with a dollop of ice cream or custard.
 I baked these cinnamon rolls into buns shape by baking it on a muffin pan. They looks like quite happy sitting on the muffin pan! Other than adding the raw sugar with cinnamon powder, I gave it some extra texture.


 Here, I've prepared some peach cakes which is a recipe from

 Mum bought me a cheesecake recipe book 我和起士蛋糕的秘密. (I think she has been addicted on buying me recipe books recently.) I miss her cooking and till now I can't forget those delicious foods she cooked and baked. But, she said she had retired from the kitchen :( Anyway, I think I've inspired by her passion in the kitchen when I was young. She cooks three proper meals plus an afternoon tea to serve the whole family including my grandparent and aunties uncles. I like to touch the ingredients while she was preparing foods but I always got warning not to touch this and that. If you're a mother you'll understand why she warn me. But, that wasn't stop me from loving the kitchen stuffs :) Oppss... back to the cheesecake recipe book. To appreciate mum, I think I better try out one of the recipe from the book. Since I've still got some leftover durian in the freezer, I decided to try out durian cheesecake recipe.
 I didn't put so much hope on this recipe at first, because this is my first attempt and the recipe is not that very precise. I used a slightly bigger cake pan to make this also modify the amount of ingredients used from the recipe.
 Guess what! The result is absolutely fantastic! If you're a durian lover and cheesecake lover, you'll hardly to resist this. The cheesecake turn out moist, rich and smooth. You will like it to melt in my your mouth slowly and feel hard to let go!
The recipe didn't mention about steam bake but I did it as I think steam bake would produce moisture cheesecake, that's what I found from my previous attempts on other cheesecake experiments. There is just one thing I didn't do it properly for drawing the net pattern on the cheesecake, it wasn't as nice as the recipe shown from the book (need more practice!) However, I must say the texture is a winner! Really yummy! Thanks mum for the recipe book!
Guess what! The result is absolutely fantastic! If you're a durian lover and cheesecake lover, you'll hardly to resist this. The cheesecake turn out moist, rich and smooth. You will like it to melt in my your mouth slowly and feel hard to let go!
The recipe didn't mention about steam bake but I did it as I think steam bake would produce moisture cheesecake, that's what I found from my previous attempts on other cheesecake experiments. There is just one thing I didn't do it properly for drawing the net pattern on the cheesecake, it wasn't as nice as the recipe shown from the book (need more practice!) However, I must say the texture is a winner! Really yummy! Thanks mum for the recipe book!
 Recipe for 7 inches (I used 8 inches lose bottom pan)
For the base (I used my own recipe for the base):
160g crushed chocolate marie biscuits (200g digestive biscuits)
80g melted butter (100g butter, melted)
For the filling (Slightly change the amount of ingredients from the book)
450g cream cheese (500g cream cheese)
80g caster sugar
170g durian flesh (220g durian flesh)
3 eggs (medium size, total about 160g)
80ml milk (90ml milk)
1 tbsp cornstarch (1 tbsp + 1/4 tsp cornstarch)
Toppings:
1 tsp cocoa powder + 2tsp water
Some Oreo cookie crumbs
Recipe for 7 inches (I used 8 inches lose bottom pan)
For the base (I used my own recipe for the base):
160g crushed chocolate marie biscuits (200g digestive biscuits)
80g melted butter (100g butter, melted)
For the filling (Slightly change the amount of ingredients from the book)
450g cream cheese (500g cream cheese)
80g caster sugar
170g durian flesh (220g durian flesh)
3 eggs (medium size, total about 160g)
80ml milk (90ml milk)
1 tbsp cornstarch (1 tbsp + 1/4 tsp cornstarch)
Toppings:
1 tsp cocoa powder + 2tsp water
Some Oreo cookie crumbs

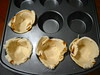
 The texture turn out quite nice with the combination of sponge cake, custard, toasted almond, chopped dark chocolate and covered with melted chocolate for the coating. Then, let it stand nicely on top of a piece of cinnamon cookies. I didn't manage to make it as pretty as the picture from the book. I think I need more practice and patient for coating the cakes. Anyway, this is something special and definitely will make it for a party.
Recipe makes 10 pieces:
180g plain sponge cake
180g chocolate sponge cake
115g
The texture turn out quite nice with the combination of sponge cake, custard, toasted almond, chopped dark chocolate and covered with melted chocolate for the coating. Then, let it stand nicely on top of a piece of cinnamon cookies. I didn't manage to make it as pretty as the picture from the book. I think I need more practice and patient for coating the cakes. Anyway, this is something special and definitely will make it for a party.
Recipe makes 10 pieces:
180g plain sponge cake
180g chocolate sponge cake
115g 
 So, thinking to make it myself. I made a simple swiss roll sponge cake and cut them into very thin round shape to layer the cake. For the cream, I mixed 270g of durian flesh with 135g custard and folded in 200ml whipped cream. This is truly a rich and creamy durian cake. I didn't add gelatin for the mixture so it's a bit runny, however it set after sitting in the fridge for few hours.
 I would like to try out a next batch with gelatin one to find out the difference. Perhaps adding some gelatin would be easier to do the decoration. For the simple one, this batch is very yummy indeed! Must do it again for some celebration party.


 Method:
 I find myself really lucky to have a friend like
 My first attempt on making mooncake. Everyone recommend to me to start with snow skin as it's quite simple to make. So, just give it a try.
 I cooked the lotus paste, it's hard work but at the end it's nice to know that all made by myself although it's not as tasty as the one I bought and the appearance could tell it's definately a homemade one.
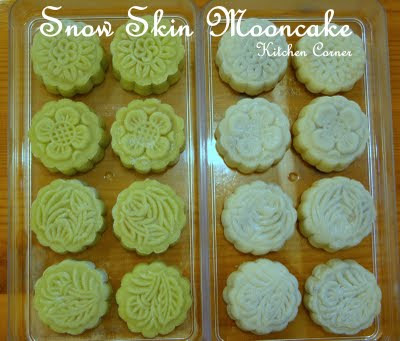 I like to play with the mould more than eating the mooncake. It's fun wrapping the lotus paste with the snow skin and stuff it into the mold and pushing it out. Playing the mooncake mold is really FUN! It's a good try. I'll not share the recipe here as I feel that this batch of mooncake still not the good one. I'll try again next year or may be I shall try out the bake version next year :)


.jpg)